Read the three colored slots above the cauldron, deliver the matching ingredients one at a time, then bring the relic back to the elevator. Your recipe can differ from another player's. The floor reward is The Amazing Liquefactive Bighead.
This is a source-checked guide, not a site-account playtest. The recipe example below is a published gameplay screenshot; it shows one run rather than a code that works for everyone.
Enter the dark maze and find the cauldron
Take a light source, choose Floor 6, and explore for the Animal Hospital-themed room. The cauldron is inside that puzzle room. Avoid treating a particular corridor turn as a guaranteed route: the Floor 6 walkthrough describes variable room and ingredient locations.
The ticket shop lists a 20-ticket Flashlight and 40-ticket Night Vision Goggles. Their purpose is visibility; we have not verified that a specific light repels this floor's pursuer or that buying a tool is an access requirement. See tickets and tools before spending.
Read the next recipe slot
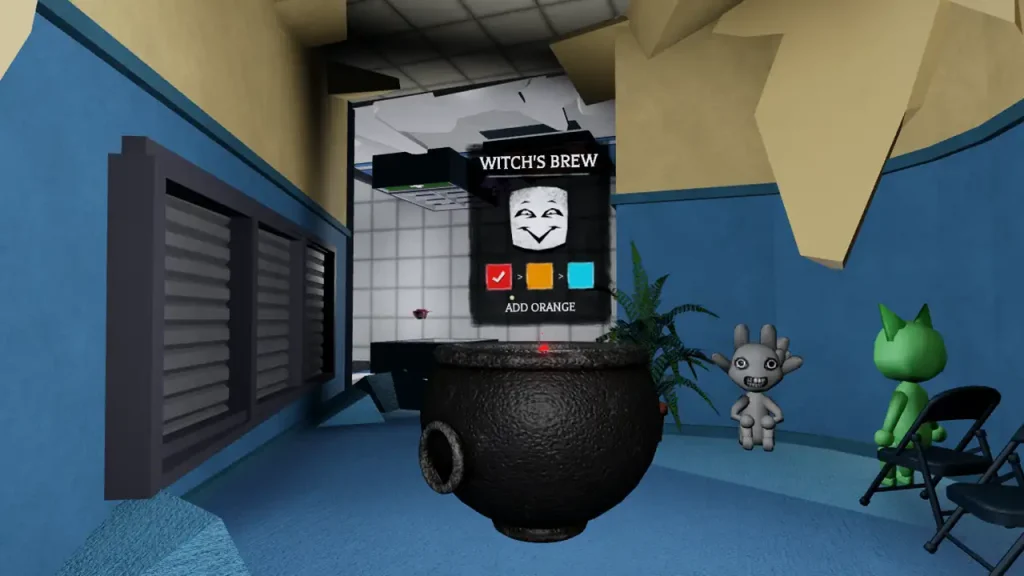
Look at the WITCH'S BREW board above the cauldron before collecting an ingredient. In the pictured example, the red slot already has a checkmark, the board says ADD ORANGE, and cyan follows it. That means the next delivery in this screenshot is orange. It does not mean every player's recipe starts with red.
After each delivery, read the board again. Compare the new checkmark or instruction with what you expected before leaving for the next ingredient. This separates two different questions: which color belongs in the recipe, and which required color the cauldron wants next.
Match colors to ingredients
The following names are the reported ingredient-color labels in AllThingsHow's cauldron section. That author attributes the puzzle details to other guides. Use the current recipe and interaction prompt to confirm a pickup rather than relying on its color in a dark screenshot alone.
| Recipe color | Reported ingredient |
|---|---|
| White | Bone |
| Yellow | Mushroom |
| Cyan | Feather |
| Orange | Pumpkin |
| Green | Glob |
| Pink | Rose |
| Red | Tomato |
Search the hospital room for the ingredient matching the current slot. Bring that ingredient back individually, use the cauldron interaction, and check the board's response. Repeat for the remaining slots. The delivery method follows TechWiser's illustrated route.
Check progress before leaving the room
| Current situation | Next check |
|---|---|
| You cannot tell what to collect | Return to the board and read the next unfinished slot |
| You collected the right-looking object | Confirm the deposit and the board's new state |
| A video lists a different color sequence | Use your own board, preserving its displayed order |
| The recipe is complete | Locate and take the relic, then return to the elevator |
If the board has not advanced, do not assume the ingredient counted. Recheck the active instruction and the interaction available at the pot. This guide does not claim a verified reset method, wrong-ingredient penalty, or universal ingredient spawn location.
Return for The Amazing Liquefactive Bighead
Finishing the mixture is the puzzle step. Completing the floor also requires the trip back with the relic. Check the award after the elevator return and inspect your avatar inventory separately. Open the Bighead claim route or reward checklist for the matching entry.
Two other Floor 6 routes are separate: Mimic Hoodie comes from the Animal Hospital partner quest, and LOLWEN requires the Banana Eats quest and its hidden hub pedestal. The cauldron does not finish either. Use the Mimic Hoodie steps and LOLWEN steps for those rewards.
For the preceding mirror task, see Floor 5. For the next torch task, see Floor 7. All claims remain subject to the event deadline.